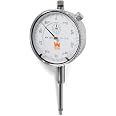
📐 Measure Like a Pro, Calibrate Like a Boss!
The WEN 10703 Precision Dial Indicator delivers professional-grade measurement accuracy with a .001-inch resolution, stainless steel construction, and a rotatable bezel for versatile use. Its 2-inch display and adjustable markers make readings effortless, while the 1/4-inch lug hole ensures easy mounting. Backed by a two-year warranty, this tool is engineered for precision and durability in any calibration or measurement task.


| Brand | WEN |
| Material | Stainless Steel |
| Range | 0.001 inches |
| Measurement Accuracy | .001 |
| UPC | 044459107033 |
| Manufacturer | WEN |
| Global Trade Identification Number | 00044459107033 |
| Part Number | 10703 |
| Item Weight | 6.7 ounces |
| Package Dimensions | 6.5 x 3.19 x 2.36 inches |
| Item model number | 10703 |
| Size | Under 3 Inches |
| Style | Dial Indicator |
| Power Source | Battery Powered |
| Item Package Quantity | 1 |
| Included Components | 1 in. Precision Dial Indicator with .001 in. Resolution |
| Batteries Required? | No |
4**D
Good quality indicator
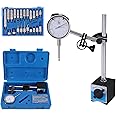
Good quality & inexpensive dial indicator. I got this to check runout on a bent lawnmower crankshaft. Also need a clamp to hold this in place, such as a magnetic base with rods and clamps. Seems very well made and worked well for this application. Would buy again.
B**N
Better gauge for price
Best gauge I have found to date for the price, actually returns to zero setting when others failed.
G**9
WEN is doing a great job!
I can't believe the quality and appearance of this indicator for the price. WEN is absolutely killing it! I am a machinist and have purchased a WEN 1/8" variable speed die grinder, a variable speed detail file sander, and now this dial indicator. All of them are solid and don't feel the least bit cheap. I tested the dial indicator on calibrated gage blocks from .050" to .750" and it was well within its accuracy range. The case and bezel are very impressive and all move freely. Great job WEN!
E**E
Really great value but may need some tweaking
I bought two of these to try out. For the two that I received the bezels were extremely tight, and would be useless in practice. But I took them apart by removing the faceplate and saw that there are two spring clamps holding down the bezel. I loosened the clamp screws and the bezels turned freely. I then put some Loctite on the loosened screws to keep them in place, and then re-assembled. Both units work fine now. Accuracy and repeatability are fine out the box. Movement of the shaft is smooth. I ordered two more. I'm using them to make locating fixtures for my mill and lathe. If not dropped or otherwise abused I don't see why they wouldn't last a long time, but time will tell. But for the price, these units are a great value.UPDATE: I received my 2 additional indicators. Same problem with the bezels, but I repeated the fix and they're good to go as well. These units are better than the ones I bought from Harbor Freight for $18. If you want to fix the bezel yourself here's what you need to do:1. Looking at the indicator face, use a dental pick and insert it the space between the top retaining ring. GENTLY work out the top retaining ring (which also serves as a rotatable index) towards the center of the face. There are two retaining rings (indexes), one on top of the other. GENTLY work it out of the slot it resides in, being careful not to bend it and permanently deform it.2. Repeat for the lower ring.3. The clear plastic lens will now drop out if you turn the indicator over. Note that the lens is convex or dome shaped.4. With the pick, remove the white beveled ring. Note its orientation so that you replace it properly.5. With the pick, lift up the graduated face plate. It has a tiny tab somewhere on its edge which holds it in place. Gently lift the faceplate until it is just underneath the needle. Now you have to very gently pull up on the tip of the needle to lift up the faceplate enough to remove it from the housing.6. You can now see two spring clamps on the outer edge held down by a small phillips-head screw.7. Remove both screws.8. Put some blue Loctite on the screws and re-install just to point where the bezel starts sticking, then back-out a 1/4 turn.9. Re-assemble in reverse order, being sure that the white beveled ring and lens are in the proper orientation. If the plunger sticks when re-assembled the lens is probably upside-down. If the needle moves when you rotate the bezel, then the needle may have been bent upwards when removing the faceplate and it is dragging. Just disassemble again, removing the retaining rings and lens only. Then put a very small screwdriver under the needle and push down on the needle tip, using the screwdriver as a fulcrum. The needle should not touch the dial or lens.10. Verify operation of the bezel and plunger motion.11. Now you have a very good $15 indicator.
J**L
It works
You get what you pay for with precision tools. It works and is accurate but the movement isn't as smooth a higher quality unit.
R**L
Works great
Works great
J**Z
Recomedado
Buen producto, funciona muy bien
J**D
Nice Gauge
Good quality tool for a reasonable price. Used to measure piston quench and crankshaft end play . Use a magnetic mount.
Trustpilot
1 day ago
2 weeks ago
2 months ago
2 months ago